

React Fundamentals: Components, JSX, State, and Re-rendering

Why React Exists?
Let's start with a question. Why did developers create React when JavaScript already existed?
Good question right? It's worth separating "JavaScript" (the language) from "how people were using it to build UIs" (the practice), because React didn't replace JavaScript, it was built to fix problems in how JavaScript was being used to manipulate the DOM.
JavaScript gave you the tools, not the structure
JavaScript has always been able to manipulate the DOM — that was never the issue. The problem was that JavaScript (and libraries like jQuery) gave developers low-level tools with no opinion on how to organize UI logic as apps grew.
With plain JavaScript, you were responsible for:
Finding the exact DOM node to update (
document.getElementById, etc.)Manually changing it when data changed
Remembering every other place on the page that depended on that same data and updating those too
This works fine for a simple page. It breaks down fast for something like Facebook's newsfeed, where a single like, comment, or notification might need to update five different parts of the screen at once.
The specific pain point: manual synchronization
This was the actual problem React was invented to solve, at Facebook, around 2011:
Facebook's notification counter would get out of sync with the actual number of notifications.
Engineers would fix it in one place, and it would break somewhere else, because the "state" of the UI lived in scattered DOM elements and callback functions, not in one predictable place.
As the codebase grew, nobody could confidently say "if I change this data, here's everything that updates" — because that logic was hand-wired, imperatively, all over the code.
This is sometimes called "callback hell" or spaghetti state — not a JavaScript limitation exactly, but a limitation of imperative DOM manipulation as an approach, once an app crosses a certain complexity threshold.
What React actually added?
React didn't give you new JavaScript capabilities. It gave you a pattern and a runtime on top of JavaScript:
| Without React | With React |
|---|---|
| You manually update the DOM when data changes | You update data (state), React figures out what DOM changes are needed |
| UI logic scattered across event handlers | UI logic organized into components |
| No single source of truth | State lives in one predictable place per component |
| You write imperative steps ("find this element, change its text") | You write declarative descriptions ("this is what the UI should look like given this data") |
So the honest framing is: JavaScript was the language; DOM manipulation via that language was the fragile practice. React was created not because JavaScript was insufficient as a language, but because there was no good architecture for building UIs that update frequently and predictably at scale — and jQuery-style direct manipulation didn't scale past a certain size of application.
It's the same reason frameworks exist in general: the language is capable, but doesn't enforce good structure on its own.
So the question arises. What is React?
What is React?
React.js is a front-end JavaScript library for building interactive user interfaces. It was developed by Facebook and is maintained by Facebook and the open-source community. React.js is a phenomenal library that is easy to understand, has excellent cross-platform support, has a fantastic community, and is one of the most loved libraries out there.
By user interfaces (UI), we mean the elements that users see and interact with on-screen. By library, we mean React provides helpful functions (APIs) to build UI, but leaves it up to the developer where to use those functions in their application.
Understanding JSX
JSX (JavaScript XML) is a syntax extension for JavaScript that lets you write HTML-like markup directly inside your JavaScript code.
const element = <h1>Hello, world!</h1>;
This isn't valid plain JavaScript or HTML, it's a special syntax that gets transformed before the browser ever sees it. JSX isn't required to use React, but it's the standard way most React developers write UI code because it closely mirrors the final rendered output.
You would ask that why was JSX introduced if we can write markup using HTML?
Before JSX, building UI in JavaScript looked like this:
React.createElement('h1', { className: 'title' }, 'Hello, world!');
This works, but becomes unreadable fast once you nest multiple elements:
React.createElement('div', null,
  React.createElement('h1', null, 'Hello'),
  React.createElement('p', null, 'Welcome to my app')
);
React's core idea is that markup and the logic that produces it are tightly coupled a button's click handler, its label, and its styling all describe the same piece of UI, so separating them into different files (as with traditional HTML/CSS/JS separation) often made code harder to follow, not easier.
JSX was introduced to:
Let developers write UI structure in a familiar, HTML-like way
Keep markup and logic together in one place, colocated by component rather than by file type
Make code easier to visualize — you can look at JSX and get a rough mental picture of the rendered output
Provide compile-time checks and better tooling (autocomplete, syntax errors) compared to using strings or nested function calls
JSX vs HTML
They look similar but aren't the same thing. Key differences:
| HTML | JSX |
|---|---|
class="btn" |
className="btn" (since class is a reserved word in JS) |
for="name" |
htmlFor="name" |
onclick="fn()" |
onClick={fn} (camelCase, references a function) |
Self-closing optional (<img>) |
Self-closing required (<img />) |
| Attributes are strings | Attributes can be any JS expression (disabled={isLoading}) |
| Standalone document | Must return a single root element (or a Fragment <>...</>) |
| Case-insensitive tags | Case-sensitive — lowercase = HTML tag, Capitalized = React component |
Embedding JavaScript Inside JSX
You embed JavaScript expressions using curly braces {}:
  function Greeting({ name, isLoggedIn }) {
  const currentHour = new Date().getHours();

  return (
    <div>
      <h1>Hello, {name}!</h1>
      <p>The time is {currentHour}:00</p>

      {/* Conditional rendering */}
      {isLoggedIn ? <p>Welcome back!</p> : <p>Please log in.</p>}

      {/* Rendering a list */}
      <ul>
        {['Apple', 'Banana', 'Cherry'].map(fruit => (
          <li key={fruit}>{fruit}</li>
        ))}
      </ul>
    </div>
  );
}
Rules to keep in mind:
Curly braces accept expressions, not statements —
{if (x) {...}}is invalid, but{x ? a : b}works.You can embed variables, function calls, ternaries, and array
.map()results — but notforloops orifstatements directly.{}used for JS expressions is different from{{}}you'll see for inline styles — that's actually a JS object literal passed inside a single pair of braces:style={{ color: 'red' }}.
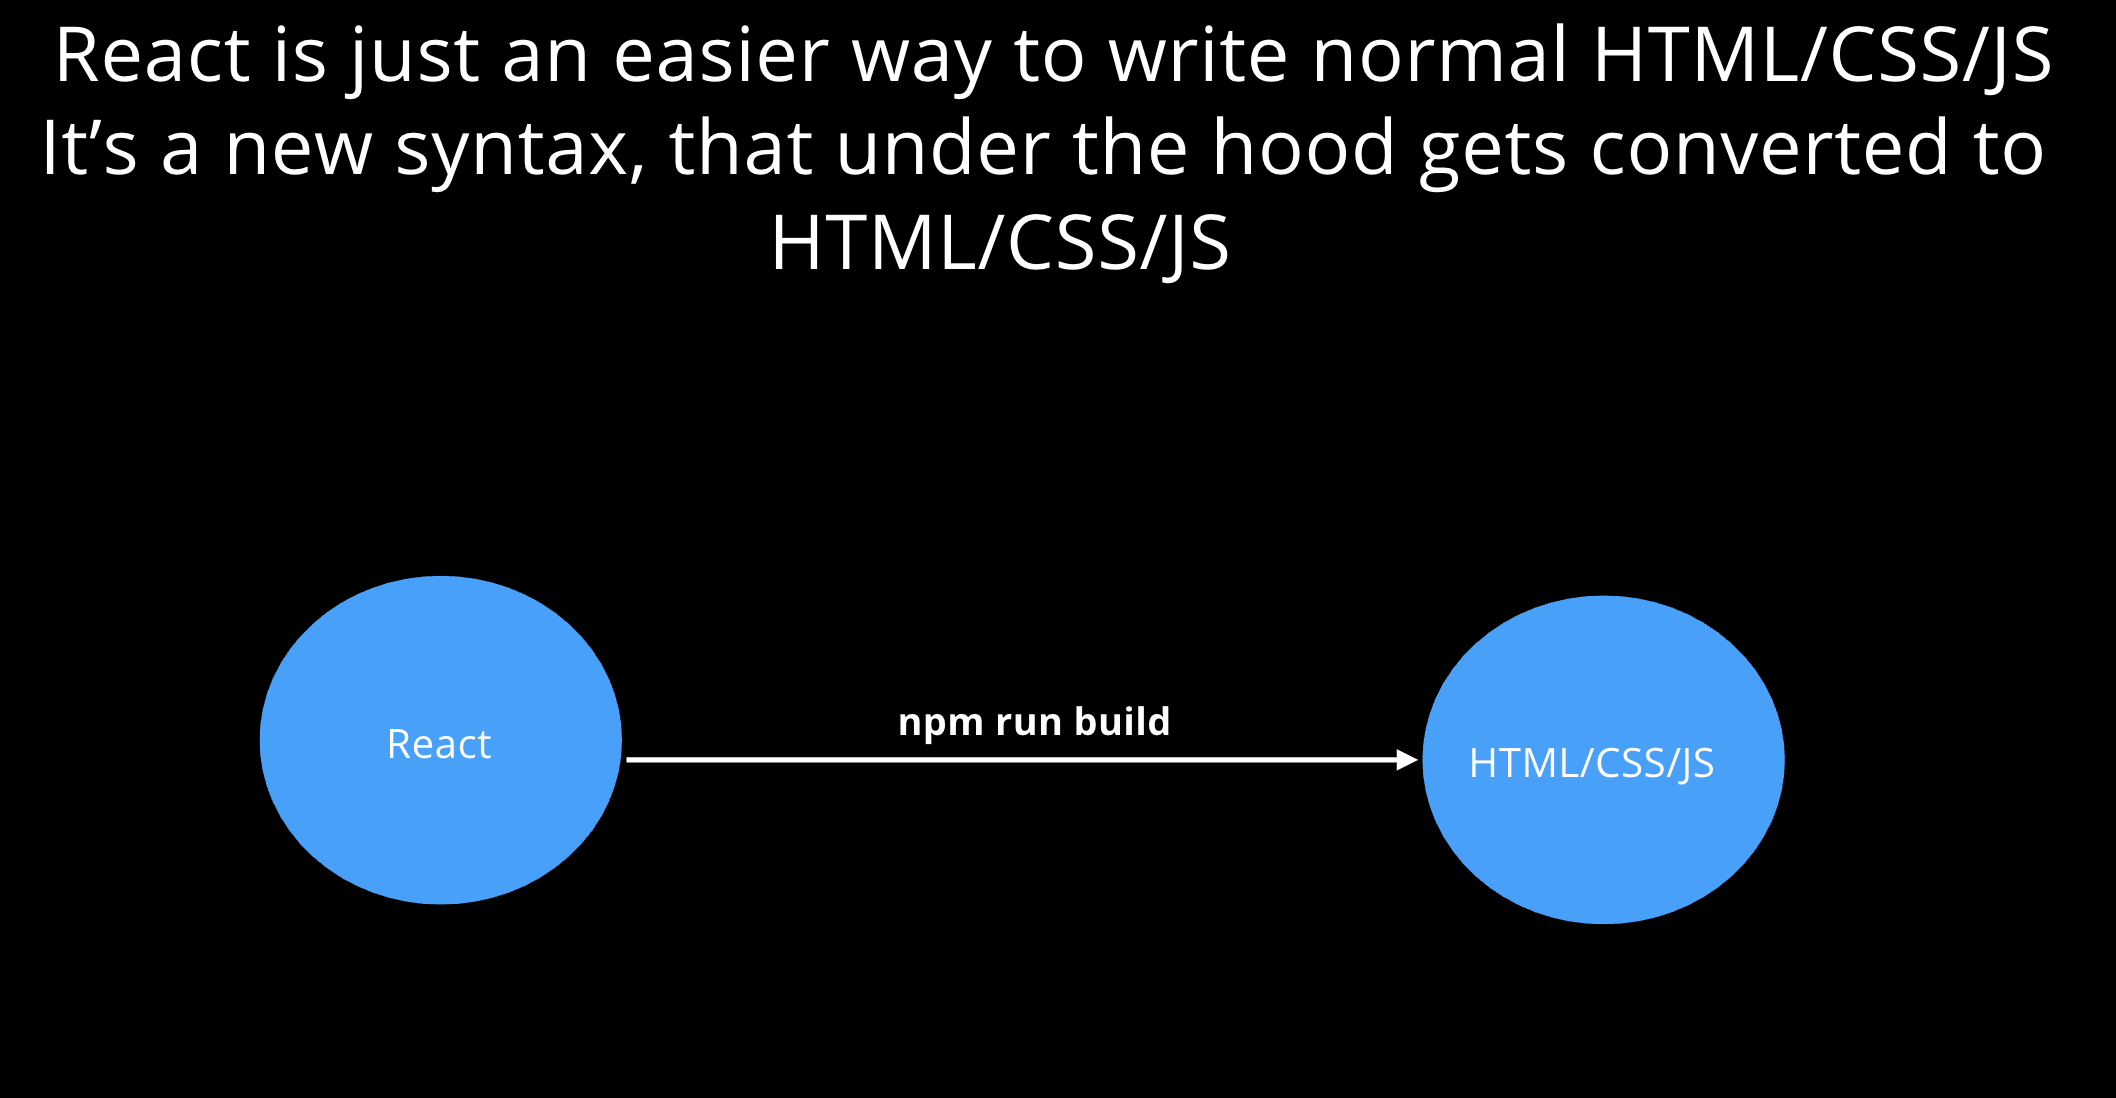
Browsers don't understand JSX natively — it must be compiled/transpiled into regular JavaScript before it runs. This is typically done by Babel (or a bundler like Vite/esbuild using similar tooling).
Step by step:
1. You write JSX:
const element = <h1 className="title">Hello</h1>;
2. Babel transforms it into a function call. In modern React (17+), this uses the automatic JSX runtime:
   import { jsx as _jsx } from "react/jsx-runtime";
   const element = _jsx("h1", { className: "title", children: "Hello" });
(Older versions compiled to React.createElement("h1", { className: "title" }, "Hello") — functionally equivalent.)
3. That function call returns a plain JavaScript object — a lightweight description of the UI, often called a React element:
   {
     type: "h1",
     props: { className: "title", children: "Hello" }
   }
4. React uses this object tree (the "virtual DOM") to figure out what actual DOM nodes need to be created or updated, then applies only the necessary changes to the real DOM.
So the pipeline is:
JSX → Babel/compiler → JS function calls → React elements (plain objects) → Real DOM updates
Components in React
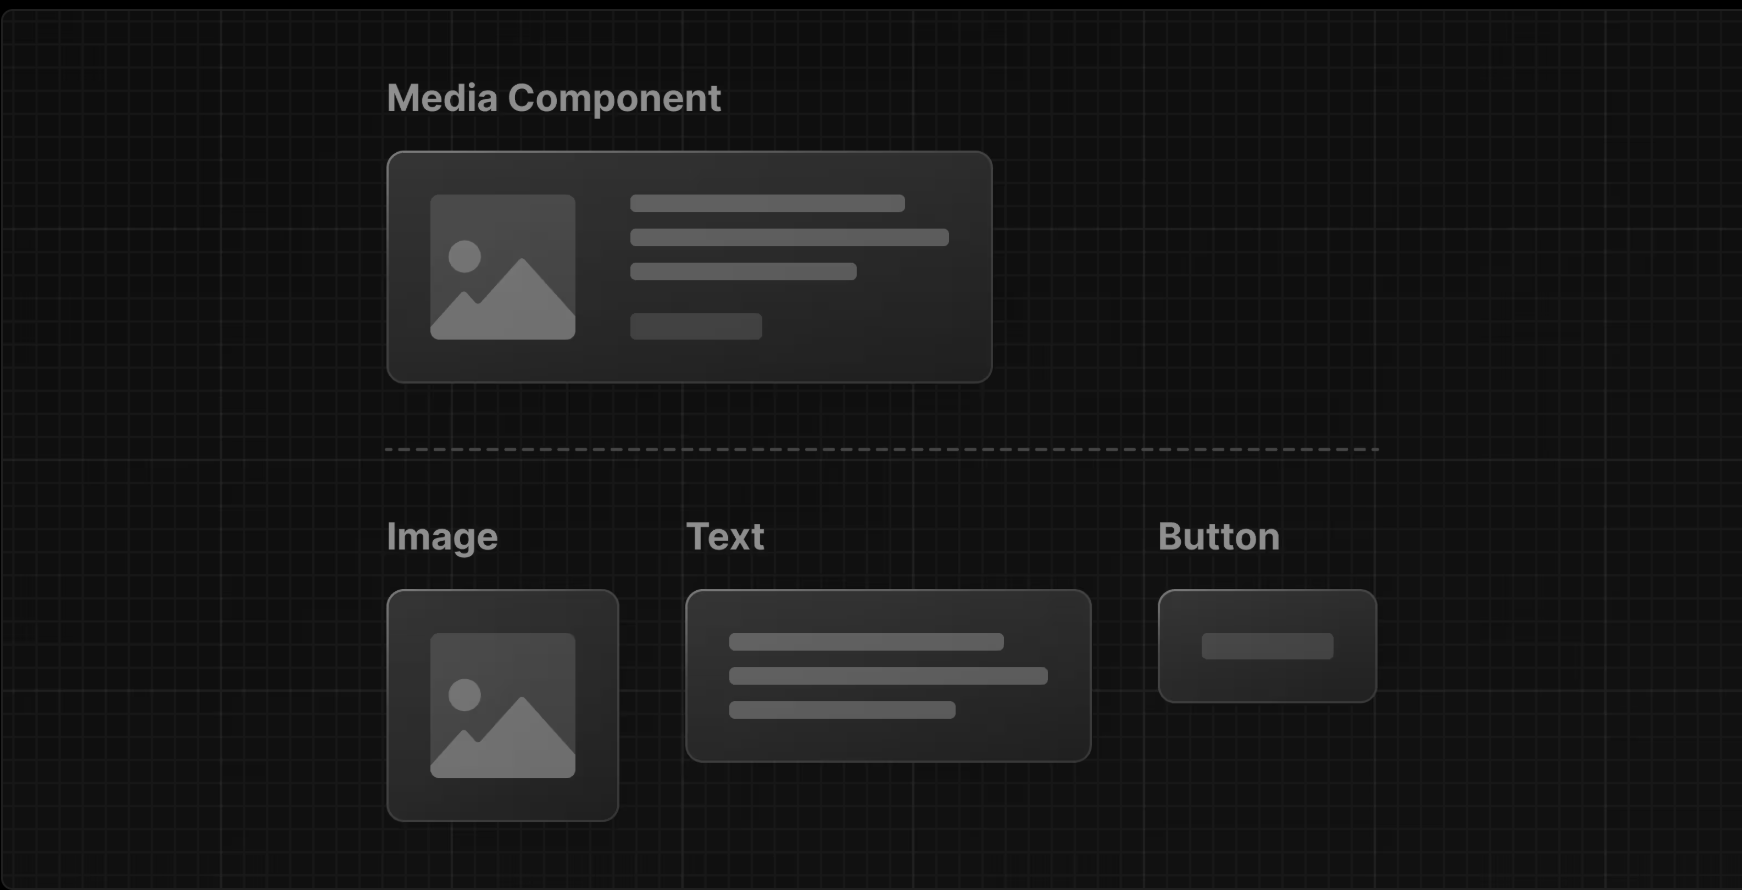
User interfaces can be broken down into smaller building blocks called components.
Components allow you to build self-contained, reusable snippets of code. If you think of components as LEGO bricks, you can take these individual bricks and combine them together to form larger structures. If you need to update a piece of the UI, you can update the specific component or brick.
Breaking Large UIs into Smaller Pieces
As UIs grow, it becomes hard to manage everything in one giant component. The standard practice is to decompose a large UI into smaller, focused components — each responsible for one clear job.
For example, a full page might break down like this:
function ProfilePage() {
  return (
    <div>
      <Header />
      <ProfileInfo />
      <PostList />
      <Footer />
    </div>
  );
}
Each of Header, ProfileInfo, PostList, and Footer is its own component, possibly composed of even smaller components (e.g., PostList might render many Post components).
Benefits of breaking things down this way:
Readability — each component is small and easy to understand
Reusability — a
ButtonorCardcomponent can be used all over the appTestability — small components are easier to test in isolation
Maintainability — changes to one piece (e.g., how a
Postlooks) don't require touching unrelated code
Props in React
To make our components accept different data, we can use props. Props are arguments passed into React components. They are passed to components via HTML attributes.
Props is just a shorter way of saying properties.
We use props in React to pass data from one component to another (from a parent component to child components), But you can't pass props from a child component to parent components. Data from props is read-only and cannot be modified by a component receiving it from outside.
Props flow one way: from parent to child. A parent component decides what data a child needs and passes it down explicitly.
function App() {
  const user = { name: "Ananya", role: "Admin" };

  return <UserProfile user={user} />;
}

function UserProfile({ user }) {
  return (
    <div>
      <h2>{user.name}</h2>
      <p>{user.role}</p>
    </div>
  );
}
Here, App is the parent and UserProfile is the child. The user object is created in App and handed down as a prop.
Since data only flows downward, how does a child "talk back" to a parent? The common pattern is to pass a function as a prop. The child calls that function, and the parent handles the logic.
function App() {
  const handleButtonClick = (message) => {
    console.log("Child said:", message);
  };

  return <Child onNotify={handleButtonClick} />;
}

function Child({ onNotify }) {
  return (
    <button onClick={() => onNotify("Button was clicked!")}>
      Click me
    </button>
  );
}
Key takeaway: the same component, combined with different props, can render endless variations, that's the core idea that makes React components powerful and reusable across an entire application.
State in React
A State is a plain JavaScript object used by React to represent a piece of information about the component's current situation. It's managed in the component (just like any variable declared in a function).
The state object is where you store property values that belongs to the component. When the state object changes, the component re-renders. State data can be modified by its own component, but is private (cannot be accessed from outside)
import { useState } from "react";

function Counter() {
  const [count, setCount] = useState(0);

  return <p>Current count: {count}</p>;
}
Here, count is a piece of state. useState(0) initializes it to 0, and setCount is the function used to update it.
Without state, components could only render static output based on props, they'd have no way to "remember" anything or react to user interaction (clicks, typing, toggles, etc.).
State exists to answer the question: "What does this component need to remember between renders?"
Examples of things that typically need state:
Whether a modal is open or closed
The current value of an input field
Items in a shopping cart
Whether data is still loading
The active tab in a tab bar
Without state, none of these interactive behaviors would be possible — the UI would just be a fixed snapshot.
You never modify state directly. Instead, you call the setter function returned by useState, and React handles re-rendering the component with the new value.
function Counter() {
  const [count, setCount] = useState(0);

  const increment = () => setCount(count + 1); // ✅ correct
  // count = count + 1; // ❌ never do this directly

  return <button onClick={increment}>Count: {count}</button>;
}
Important nuance — state updates can be asynchronous/batched. If a new state value depends on the previous one, use the functional update form to avoid stale values:
function Counter() {
  const [count, setCount] = useState(0);

  const incrementTwice = () => {
    setCount((prev) => prev + 1);
    setCount((prev) => prev + 1);
  };

  return <button onClick={incrementTwice}>Count: {count}</button>;
}
Using (prev) => prev + 1 guarantees each update builds on the latest value, rather than relying on a count variable that might be stale within the same render.
Also, calling a setter triggers a re-render — React re-runs the component function with the updated state so the UI reflects the change.
Understanding Re-Rendering
A re-render happens when React calls a component function again to figure out what the UI should look like now. There are three main triggers:
State changes — calling a
useStatesetter functionProps changes — a parent re-renders and passes new prop values down
Parent re-renders — when a parent component re-renders, its children usually re-render too (even if their own props didn't change)
function App() {
  const [count, setCount] = useState(0);

  return (
    <div>
      <button onClick={() => setCount(count + 1)}>Increment</button>
      <Display count={count} />
    </div>
  );
}

function Display({ count }) {
  console.log("Display rendered");
  return <p>Count: {count}</p>;
}
Every time the button is clicked, setCount runs → App re-renders → Display receives a new count prop → Display re-renders too.
When you call a state setter, React schedules a re-render of that component (and its children). The component function runs again from top to bottom, producing new JSX based on the current state values.
function Toggle() {
  const [isOn, setIsOn] = useState(false);

  console.log("Toggle rendered, isOn =", isOn);

  return (
    <button onClick={() => setIsOn(!isOn)}>
      {isOn ? "ON" : "OFF"}
    </button>
  );
}
Each click flips isOn, which triggers a re-render, which prints a new log line and updates the button label. React compares the new JSX output to the previous one (using a process involving the virtual DOM) and only updates the real DOM where something actually changed — it doesn't repaint the whole page.
Note: calling a setter with the same value it already holds (e.g., setCount(5) when count is already 5) will generally not trigger a re-render — React bails out early since there's nothing new to reflect.
Component Lifecycle from a High Level
Every component roughly goes through three phases:
Mounting — the component is created and inserted into the DOM for the first time
Updating — the component re-renders due to state or prop changes (this is the re-rendering we've been discussing)
Unmounting — the component is removed from the DOM (e.g., a conditional stops rendering it)
function Timer() {
  const [seconds, setSeconds] = useState(0);

  useEffect(() => {
    console.log("Mounted!");
    const interval = setInterval(() => {
      setSeconds((s) => s + 1);
    }, 1000);

    return () => {
      console.log("Unmounted, cleaning up interval");
      clearInterval(interval);
    };
  }, []);

  return <p>Seconds: {seconds}</p>;
}
The
useEffectwith an empty[]dependency array runs once on mount.Its return function (the cleanup) runs on unmount.
Every time
secondschanges, that's an update (re-render) — but since[]is empty, the effect itself doesn't re-run on every update, only the cleanup/setup pair runs once.
This mount → update (many times) → unmount cycle is the high-level lifecycle every component goes through.
Why React Updates the UI Automatically
This goes back to React's core philosophy: the UI is a function of state and props. You never manually tell React "change this text" or "hide this button." Instead:
You describe what the UI should look like for any given state/props (via JSX)
When state or props change, React re-runs that description
React compares the new description to the old one (virtual DOM diffing)
React updates only the parts of the real DOM that actually changed (this process is often called reconciliation)
// You just describe the "what":
return isLoggedIn ? <Dashboard /> : <LoginPage />;

// You never write imperative code like:
// document.getElementById("app").innerHTML = isLoggedIn ? dashboardHTML : loginHTML;
This automation is why React feels declarative and predictable — you don't have to manually track which DOM elements need updating when data changes. You just update the state, and React figures out the rest efficiently.
Imperative vs Declarative Programming
Imperative programming means writing step-by-step instructions telling the computer how to do something — you manually manage each action and mutation.
Declarative programming means describing what you want the end result to be, and letting something else (React, in this case) figure out how to achieve it.
Imperative example (vanilla JS/DOM manipulation):
// Imperative: manually walk through every step
const button = document.createElement("button");
button.textContent = "Off";
button.className = "btn btn-off";

button.addEventListener("click", () => {
  if (button.textContent === "Off") {
    button.textContent = "On";
    button.className = "btn btn-on";
  } else {
    button.textContent = "Off";
    button.className = "btn btn-off";
  }
});

document.body.appendChild(button);
Here, you're responsible for every mutation: creating the element, setting its text, updating its class, tracking its current state by reading the DOM itself.
Declarative example (React):
function ToggleButton() {
  const [isOn, setIsOn] = useState(false);

  return (
    <button
      className={isOn ? "btn btn-on" : "btn btn-off"}
      onClick={() => setIsOn(!isOn)}
    >
      {isOn ? "On" : "Off"}
    </button>
  );
}
Here, you just describe: "Given isOn, the button should look like this." You never touch the DOM directly or track what the button currently says — React handles that.
Describing UI Instead of Manipulating UI
In the imperative world, you think in terms of commands: "find this element, change its text, add this class, remove that class." Bugs often creep in because the actual DOM state and your mental model of it can drift out of sync — especially as an app grows.
In React, you never issue direct manipulation commands. Instead, you write a function that maps data → UI:
function ShoppingCartBadge({ itemCount }) {
  return (
    <span className="badge">
      {itemCount > 0 ? itemCount : ""}
    </span>
  );
}
Benefits of Declarative Rendering
1. Less manual bookkeeping You don't need to track the DOM's current state yourself — the component's state/props are the source of truth.
2. Easier to reason about Given a specific state, the output is always the same. You can look at a component and know exactly what will render, without tracing through a sequence of mutations.
function StatusBadge({ status }) {
  if (status === "success") return <span className="badge green">✓ Success</span>;
  if (status === "error") return <span className="badge red">✕ Error</span>;
  return <span className="badge gray">Pending</span>;
}
No matter how status got to its current value, this always renders the same way — no hidden mutation history to worry about.
3. Fewer bugs from inconsistent UI state In imperative code, it's easy to forget to update one part of the UI when the underlying data changes (e.g., updating the count but forgetting to update the badge's visibility). Declarative rendering ties everything to the same source of truth, so nothing gets left behind.
4. Composability Declarative components describe themselves purely in terms of inputs, so they can be nested, reused, and combined without worrying about when or how they get updated — that's handled uniformly by the framework.
Component Tree Architecture
1. Parent Components
A parent component is any component that renders another component inside it. Parents are responsible for:
Deciding what children to render
Passing data down to children (via props)
Coordinating shared state that multiple children need
function App() {
  return (
    <div>
      <Header />
      <Dashboard />
    </div>
  );
}
Here, App is the parent of Header and Dashboard. It controls their placement and can pass them whatever data they need.
2. Child Components
A child component is any component rendered inside another. Children receive data from their parent via props and typically don't know (or care) who their parent is — they just render based on whatever props they're given.
function Dashboard() {
  const user = { name: "Kavya", role: "Editor" };

  return <ProfileCard user={user} />;
}

function ProfileCard({ user }) {
  return (
    <div className="card">
      <h3>{user.name}</h3>
      <p>{user.role}</p>
    </div>
  );
}
ProfileCard is a child of Dashboard. It has no idea where user came from — it just renders whatever it's handed. This decoupling is what makes components reusable in different parts of a tree.
A component can be a parent and a child at the same time — Dashboard is a child of App, but a parent to ProfileCard.
3. Data Flow
React data flow is unidirectional (one-way): data flows down the tree via props, from parent to child, to grandchild, and so on.
function App() {
  const currentUser = { name: "Ishaan", isAdmin: true };

  return <Dashboard user={currentUser} />;
}

function Dashboard({ user }) {
  return <Sidebar user={user} />;
}

function Sidebar({ user }) {
  return <UserBadge user={user} />;
}

function UserBadge({ user }) {
  return <p>{user.name} {user.isAdmin && "(Admin)"}</p>;
}
Here, currentUser starts in App and flows down through three layers (Dashboard → Sidebar → UserBadge) before it's finally used. This pattern — passing a prop through components that don't use it themselves, just to get it to a deeply nested child — is sometimes called "prop drilling."
Prop drilling works fine for shallow trees, but in deeply nested apps it can get unwieldy. That's usually solved later with tools like Context or state management libraries — but the underlying data flow rule (parent → child) never changes.
If a deeply nested child needs to send data back up, it does so the same way covered in the props lesson: the parent passes a callback function down as a prop, and the child calls it.
4. Application Structure
As real apps grow, component trees are typically organized around a few common patterns:
Layout components — structural pieces that stay consistent across pages (Header, Footer, Sidebar, Layout)
Page/container components — represent a full "screen" or route, often responsible for fetching data and coordinating state
Presentational/UI components — small, reusable, often stateless pieces focused purely on rendering (Button, Card, Avatar, Badge)
function HomePage() {
  const [posts, setPosts] = useState([]);

  useEffect(() => {
    fetchPosts().then(setPosts);
  }, []);

  return (
    <Layout>
      <PostList posts={posts} />
    </Layout>
  );
}

function Layout({ children }) {
  return (
    <div>
      <Header />
      <main>{children}</main>
      <Footer />
    </div>
  );
}
Here, HomePage acts as a container (handles data/state), Layout provides consistent structure, and smaller components like PostList and Post handle presentation.
Where should state live?
A useful rule of thumb: state should live in the lowest common ancestor of all the components that need it. If two sibling components both need access to the same piece of data, lift that state up to their shared parent rather than duplicating it.
React Rendering Lifecycle Overview
The Three Phases
Every component render in React goes through three high-level phases: Trigger, Render, and Commit. Understanding these separately clears up a lot of confusion about when things actually happen.
Trigger → Render → Commit
Phase 1: Trigger
A render is triggered by one of two things:
Initial mount — the component is rendered for the first time (e.g.,
ReactDOM.createRoot(...).render(<App />))State/props update — a
useStatesetter is called, a parent re-renders, or context changes
// Trigger #1: Initial mount
ReactDOM.createRoot(document.getElementById("root")).render(<App />);

// Trigger #2: State update
function App() {
  const [count, setCount] = useState(0);
  return <button onClick={() => setCount(count + 1)}>{count}</button>;
  // Clicking the button "triggers" a re-render
}
Phase 2: Render
During the render phase, React calls your component functions to figure out what the UI should look like. This phase is pure calculation — React builds a description of the UI (the virtual DOM / React element tree) but does not touch the actual browser DOM yet.
function Greeting({ name }) {
  console.log("Rendering Greeting"); // happens during the render phase
  return <h1>Hello, {name}</h1>;
}
Key facts about the render phase:
It must be pure — no side effects (no DOM mutation, no network calls) should happen directly in the component body
On the initial render, React calls every component in the tree
On a re-render, React calls only the components that were triggered to update (and, by default, their children — as covered in the re-rendering lesson)
React can pause, abort, or restart this phase (especially with concurrent features) since it's just calculation, not real changes yet
function Timer() {
  // ❌ Side effect during render — not allowed
  document.title = "Timer running";

  return <p>Time's up!</p>;
}
function Timer() {
  // ✅ Side effect moved to useEffect, runs after render/commit
  useEffect(() => {
    document.title = "Timer running";
  });

  return <p>Time's up!</p>;
}
Phase 3: Commit
Once React finishes calculating the new UI description, it moves to the commit phase — this is where React actually applies changes to the real DOM.
On initial mount, React uses
appendChild()(or similar) to insert all the DOM nodes it createdOn a re-render, React compares the new element tree to the previous one (a process called reconciliation / "diffing") and applies only the minimal set of changes needed
function Clock({ time }) {
  return (
    <div>
      <h1>Current time</h1>
      <p>{time}</p>
    </div>
  );
}
If time changes, React doesn't recreate the <h1> or the <div> — it diffs the tree, sees only the text inside <p> changed, and updates just that text node in the real DOM.
After the commit phase, the browser paints the updated screen, and any useEffect callbacks (that had a dependency change) run.
Putting It Together: A Full Cycle
function Counter() {
  const [count, setCount] = useState(0);

  useEffect(() => {
    console.log("Committed! count is now:", count);
  }, [count]);

  console.log("Rendering with count =", count);

  return <button onClick={() => setCount(count + 1)}>{count}</button>;
}
Clicking the button produces this sequence:
Trigger —
setCount(count + 1)is calledRender —
Counterfunction runs again, logs"Rendering with count = 1", produces new JSXCommit — React updates the button's text in the real DOM
Paint — browser shows the updated button
Effect —
useEffectruns (sincecountchanged), logs"Committed! count is now: 1"
Mount vs. Update vs. Unmount (Lifecycle Stages)
Zooming out, this Trigger → Render → Commit cycle repeats across a component's lifetime, which breaks into three stages:
| Stage | What happens | Hook equivalent |
|---|---|---|
| Mount | Component is created and inserted into the DOM for the first time | useEffect(() => {...}, []) |
| Update | Component re-renders due to state/props/context changes | useEffect(() => {...}, [dep]) |
| Unmount | Component is removed from the DOM | Cleanup function returned from useEffect |
function ChatRoom({ roomId }) {
  useEffect(() => {
    console.log(`Mounted / roomId changed to ${roomId}`);
    const connection = connectToRoom(roomId);

    return () => {
      console.log(`Cleaning up before unmount / before next roomId`);
      connection.disconnect();
    };
  }, [roomId]);

  return <p>Connected to {roomId}</p>;
}
If roomId changes, React runs the cleanup from the previous render before running the new effect — this is sometimes called "unmount + remount" behavior for effects, even though the component itself doesn't actually unmount from the DOM.


